Using the Web Photo Gallery Generator
The Web Photo Gallery Generator automatically generates a web page photo gallery. You can specify the source images to use, what image format and quality to use for the generated thumbnails and source images, and you can customize the generated HTML code as you require.
To use the Web Photo Gallery Generator:
Click on the Tools > Web Photo Gallery Generator menu option.
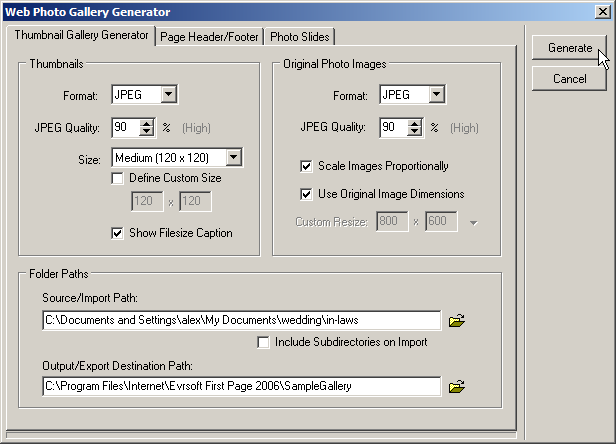
Select the thumbnail image format from the Format field in the Thumbnails area.
If the thumbnails are going to be JPEG files, select the percentage quality of the images from the JPEG Quality field.
Select the size for the thumbnails from the Size drop-down list. If you want to use a custom size for the thumbnails, click on the Define Custom Size tick box and enter the pixel sizes in the fields beneath the drop-down list.
De-select the Show Filesize Caption tick box if you do not want to include the size of the thumbnail with the image.
Select the original photograph image format from the Format field in the Original Photo Images area.
If the generated copies of the original images are going to be JPEG files, select the percentage quality of the images from the JPEG Quality field.
De-select the Scale Images Proportionally tick box if you do not want the images to be re-sized proportionally.
If you do not want to use the original image size, de-select the Use Original Image Dimensions tick box and enter the required dimensions in the Custom Resize fields.
Select the source images for the photo gallery by using the
 button next to the Source/Import Path field.
If you need to include images in sub-directories click on the Include Subdirectories on Import.
Select the destination path for the photo gallery by using the
button next to the Output/Export Destination Path field.If you need to need to alter the header and/or footer information for the photo gallery, click on the Page Header/Footer tab and alter the following fields:
Columns - Enter the number of image columns to generate.
Rows - Enter the number of image rows to generate.
Thumb Prefix - Enter the prefix for each thumbnail image, if required.
Title Of Photo Album - Enter the title of the image gallery page.
Header HTML - Enter the HTML code used before the gallery images.
Footer HTML - Enter the HTML code used after the gallery images.
Cell Data - Enter the HTML code used for each gallery images.
If you want to generate image slides, Photo Slides tab and alter the following fields:
Link to Original Images - Select this tick box if you want to link directly to the original images and not generate new ones. No HTML code will be generated for each slide.
Don't Use Thumbnail in Previous/Next Links - Select if you do not want to use thumbnails images for the Previous and Next links.
Photo Slide JPEG Quality - Select the percentage quality of the generated images from the Photo Slide JPEG Quality field.
Photo Slide HTML contents - Enter the HTML code used for the slides. Thumbnails images are used for the Previous or Next links.
Alternative Slide HTML - Enter the HTML code used for the slides. No thumbnails images are used for the Previous or Next links.
Click on the button.